This post may contain affiliate links. See my disclosure policy for more details.
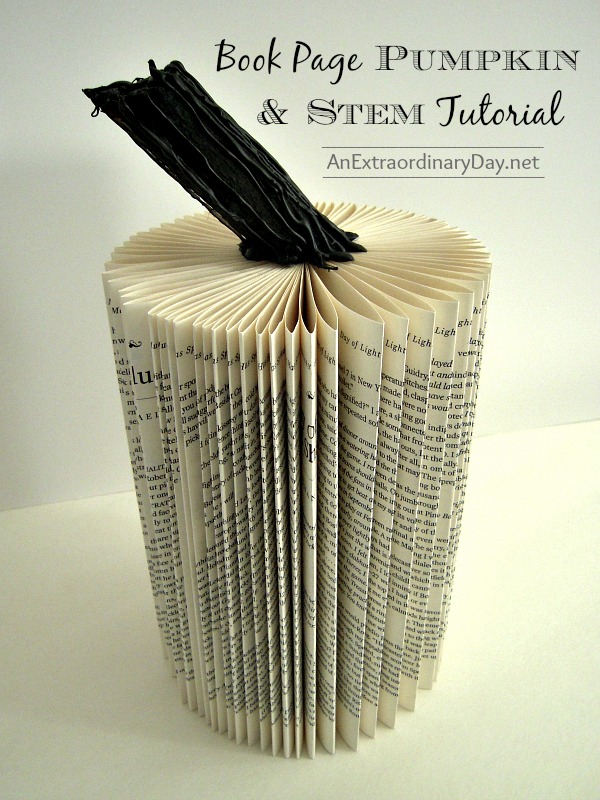
Hello Create.Craft.Love. readers! I am head-over-heels in love with my new favorite fall project using book pages. This Book Page Pumpkin is fun and easy and I can’t wait to share it with you today!

Fall….
I guess it’s unofficially here and time for me to embrace it in all it’s beauty.
As a blogger there is one itty bitty problem.
We generally are trying to get ahead of the season a bit so that our readers can be inspired, ahead of time with our ideas, and actually get a chance to use them this year.
So what’s a gal to do when she wants pumpkins for her vignette? Create them from book pages, of course!
A nice tall book page pumpkin is easy to make. Crafting skills are not required.
Create a Cylindrical Book Page Pumpkin
Materials:
Paperback book
Glue gun and glue (optional)
Steps:
- A larger paperback book will give you a larger pumpkin. This one is from a book that was about 7 inches wide by 10 inches tall.
- Rip the covers off the book and spine to begin.
- You’ll need about 250 or more pages to make the pumpkin. If your book is a thick one, rip off the extra pages at the spine.
- If the spine is tough, you might want to score it a little with something sharp.
- To make the process easier, start folding the pages back in sections to loosen the spine a little…which will make your pumpkin’s shape nicely round on all sides.
- Start at one end and page by page, start folding the outer edge of the page into the spine.
- This will seem like it takes forever, and then you’re almost done. [wink]
- Once all the pages have been folded, shape the cylinder you’ve created. If necessary, you can run a bead of hot glue down the edge of one side of the spine and push the two sides of the spine together. Sometimes it’s helpful to glue the two outer pages together. Often it’s not necessary.
There you have it….a Book Page Pumpkin!`
Um yeah. Right.
I know, it still looks like a cylinder.
No worries. Just give your cylinder a stem and she’ll be looking seasonally perfect in a matter of minutes.
You don’t have a stem? That might be a problem for some, but not for me…or you.
Let me show you how to create your own authentic-looking pumpkin stems.

Create Your Own Authentic-looking Pumpkin Stems
Materials:
a stick from your yard cut to the length you’d like for your pumpkin
low temp (hot) glue gun and extra glue**
scrap paper
craft paint/brushes or spray paint
** Disclaimer:: Use caution when using a hot glue gun. Be sure to protect your surface with cardboard or something similar to prevent any damage to your work surface. Use extreme caution. Do not touch the hot glue with your fingers as you are applying it.
Steps:
- To create an authentic-looking stem, cut the ends of your stick on an angle.
- Take a small piece of paper and hot glue the bottom of your stick to the paper.
- With the paper side down, carefully hold your stick and begin hot gluing ridges to your stick starting at the bottom and leaving a tiny “puddle” of hot glue at the base before drawing a ridge of glue up the side of the stick.
- Repeat the process of adding hot glue ridges vertically around your stick, puddling the bottom on the paper to make it look like a real stem.
- Carefully draw some ridges and points of glue on the top of the stem with your hot glue.
- Let it rest to cool and set up
- Once it’s cool, you can cut and tear the paper from the base of your stem.
- Paint with acrylic paints or spray paint.
- Glue your stem to the top of your pumpkin.
Steps 1 – 2

Steps 3 – 7
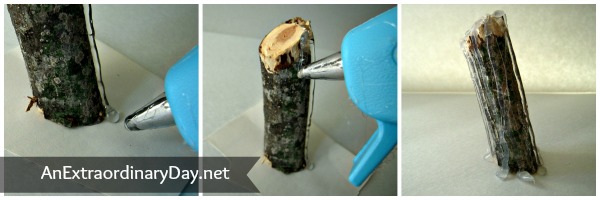
Steps 8 – 9

Now you have a truly authentic pumpkin stem to add to your cylinder….um pumpkin.
A beautiful Book Page Pumpkin….fun and easy to create.
If you want to dress it up for Halloween….
just add facial features with some heavy black paper, or cardstock, or posterboard as I did here.

You might have so much fun making your Book Page Pumpkin that you’ll want to make Book Page Christmas Trees. Pop on over to An Extraordinary Day for that and more book page crafts.
I have even more Fall-ish ideas waiting for you at An Extraordinary Day.

I just love how these turned out!!
Be sure to follow along with Diane at An Extraordinary Day!
Facebook | Pinterest | Google+
